Thursday, October 9, 2008

Video And Animation Tutorials

Video and Animation Tutorials

Photoshop extended can be used to edit image sequences and individual frames as well. Any Photoshop tool can be used to edit the files. You can apply filters, blending modes and layer styles. Like normal PSD layers, you can make selections and apply masks. However, in Photoshop you can work with video only not the Audio. Animation palette can be accessed from Window > Animation.

In layer palette, a filmstrip icon identifies an animation layer.

If you want to make your frame edits on the separate layer, you can create a blank video layer by choosing Layer > Video Layer > New Blank Video Layer. After editing you can save document as PSD file that can be played back in After Effects or Premiere. You can also render the video in quick time format or in image sequence.

Supported Video Formats

Quick Time Video Formats

MPEG-1, MPEG-4, MOV, AVI, FLV, MPEG-2

Image Sequence Formats

BMP, DICOM, JPEG, OpenEXR, PNG, PSD, Targa, Tiff, Cineon

Open footage miamibeachwalk.avi. You can download this footage from this website. In the Layer palette click on Create New Fill or Adjustment Layer and choose Curves. We will give this image little boost using the Curves non-destructive layer. Apply a contrast curve as shown below.

Now we will give sand more brownish look. Using Lasso tool make a rough selection around the sand. Feather the selection by 5 px. Create a new regular layer, select this layer and click on the create layer mask button in the layer palette. Select the layer thumbnail (Not Mask) and fill it with color code, CF6F13.

Change Blending mode to Multiply and lower opacity to 40%. Now using the brush tool fine-tune the mask.

Create a text layer and type Miami Beach, place the layer at the left bottom corner of the footage. Go to beginning of the timeline and set a keyframe for position of the layer. Jump to the end of the timeline and move the text layer at the right bottom corner of the footage using move tool. Note that a position keyframe is added at the end of the timeline.


Right click on the last keyframe and select Hold Interpolation. Interpolation is a method to fill the data between the two keyframes. It is also referred to as Tweening. Photoshop supports two type of interpolation, Linear and Hold. Changes created with linear interpolation, start and stops abruptly at each keyframe, while hold interpolation changes layer property without the gradual transition.

Create a new document and add a text layer. From Animation palette set timeline duration to 2 seconds @ 30 Frames/Sec.


Add a text layer. Create two keyframes for text and animate position of the layer as described above in Miami Beach Text Layer. Add two more keyframes at 20f and 1.10f. Select the keyframe that is at 20f and right click, choose Hold Interpolation. Preview the animation, text stops at 20f and remain still until 1.10f secs.


Close this document and revert back to the Miami Beach document. Now experiment with Opacity and Style properties and animate them. You can check video_n_animation_end.psd for final result.

PhotoShop Tutorials

Today I am telling you about How to Create Photoshop Moving Light Animation

[1]-First of all Open any Image with the help of Ctrl+O as I did take following image

Photoshop-Moving-Light-Animation1

[2]-Now Open New Layer & then create the following selection with the help of Elliptical Marquee Tool

Photoshop-Moving-Light-Animation2

[3]-Now fill the selection with ‘fffffa’color & then go to Filter>Blur>Gaussian Blur & use the following settings

Photoshop-Moving-Light-Animation3

[4]-Now your image should look like as shown below

Photoshop-Moving-Light-Animation4

[5]-Now Blending Mode of this Layer should “Overlay”

Photoshop-Moving-Light-Animation5

[6]-Now your image should look like as shown below

Photoshop-Moving-Light-Animation6

[7]-Now select Brush Tool & use the following Brush

Photoshop-Moving-Light-Animation7

[8]-Now Open New Layer & then create the following Shine with the help of Brush Tool

Photoshop-Moving-Light-Animation8

[9]-Now go to Window>Animation & then make the Duplicate Frames with the help of click on following Button which is indicating
by Hand sign

Photoshop-Moving-Light-Animation9

[10]-Now select Frame-1 & then Hide the following Layer2 with the help of Remove the EYE SIGN which is indicating by Hand Sign

Photoshop-Moving-Light-Animation10

[11]-Now select Layer1 & Pick the light with the help of MOve Tool & create the following adjustment like as shown below

Photoshop-Moving-Light-Animation11

[12]-Now select Frame-2 & then replace the light with the help of Move Tool like as shown below

Photoshop-Moving-Light-Animation12

[13]-Now make the Tween Frames with the help of Click on following Button which is indicating by Hand sign

Photoshop-Moving-Light-Animation13

[14]-Now use the following settings in Tweens

Photoshop-Moving-Light-Animation14

[15]-Now make the Duplicate Frames of frame-22 with the help of click on following Button which is indicating by Hand sign

Photoshop-Moving-Light-Animation15

[16]-Now select Frame-23 & then Unhide the Layer-2 & your image should look like as shown below

Photoshop-Moving-Light-Animation16

[17]-Now make the Duplicate Frame-24 of the 23 with the help of Click on following button which is indicating by Hand sign

Photoshop-Moving-Light-Animation17

[18]-Now select Frame-24 & then select Layer-2 & reduce the Opacity of this Layer like as shown below

Photoshop-Moving-Light-Animation18

[19]-Now select Layer-1 & pick the Light with the help of Move Tool & create the following adjustment like as shown below

Photoshop-Moving-Light-Animation19

[20]-Now make the Duplicate Frame-25 & then Hide the Layer-2 with the help of click on following Button which is indicating
by Hand sign

Photoshop-Moving-Light-Animation20

[21]-Now select Layer-1 & then create the following adjustment with the help of Move Tool & your image should look like as
shown below

Photoshop-Moving-Light-Animation21

[22]-Now make the Duplicate Frame-26 of then select Layer1 & replace the light with the help of Move Tool & your image
should look like as shown below

Photoshop-Moving-Light-Animation22

[23]-Now Make the Duplicate Frame-27 & then replace the light with the help of Move Tool like this below

Photoshop-Moving-Light-Animation23

[24]-Now apply the following Time Settings of Each Frames & then Play the Animation with the help of Click on following Button
which is indicating by Hand sign

Photoshop-Moving-Light-Animation24

[25]-Now go to File>Save for Web & Device & Save your image in GIF format

Photoshop-Moving-Light-Animation25

[26]-See below for Final Photoshop Output. I hope this is a good tutorial & U can use these Photoshop Techniques in your
Graphics Design Project

Photoshop-Moving-Light-Animation26

bubble effect in photoshop

If you want more tutorials just leave a comment. =)

Monday, October 6, 2008

Typing test software

TypingMaster Typing Test is a free, full-featured typing tester for Windows. After warming up with enjoyable typing games, you can evaluate your typing skills with any of the several test texts, or add your own. You can also view your personal test result history and print out test diplomas. Program has multiuser support and four games. In addition this package contains several features of TypingMaster Pro typing tutor such as the touch typing course (3 free lessons) and a full Numeric Keypad course.

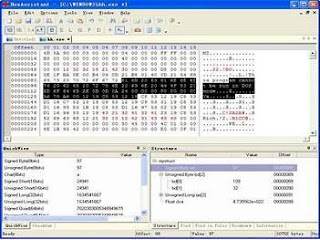
Hex Assistant

Having trouble editing your hex codes? With HexAssistant you can edit, copy, cut, paste, insert, and delete hex, print hex dumps, and export to C Source or Java Source file. HexAssistant also contains a Data Quick Viewer and Structure Viewer so you can view and edit the interpreted decimal values. HexAssistant supports Disk Editing.

Web Page Maker

Web Page Maker is an easy-to-use web page design tool that allows you to create and upload a professional web page in minutes without having to know HTML. Simply add text, images, photos, animation, navigation bar, flash, buttons, logos, and more onto web page and move them freely. It offers several pre-designed templates, so you can create a new web page from them.

I don't have a screen shots here but i can assure you that This is the FASTEST and EASIEST way to build multiple web sites there is. Plug in even the most difficult javascripts easily - insert menus, flash movies, videos of all types, create and insert custom headers fast - and it's all WYSIWYG and you can plug in any HTML you want to anywhere you want to too. So - if you can't build a web site and don't know any HTML at all, get this and learn HTML as you go - but get your site up today! I love it. This one is well worth paying for. All programs should be this well designed.

Thursday, June 5, 2008

VideoLan Project

The VideoLAN Project

The Project

VideoLAN produces free software for video, released under the GNU General Public License.

It started as a student project at the French École Centrale Paris but is now a worldwide project with developers from 20 countries.

Hosted projects

Although VLC media player is the most well-known VideoLAN project, we do host several other video-related projects, mostly aimed at developers:

  • libdvdcss, a C library to access DVDs without having to bother about the decryption.
  • libdvbpsi, a C library to decode and generate MPEG TS and DVB PSI tables.
  • x264, a H264 / AVC encoder.
  • libdca, a DTS Coherent Acoustics decoder.
  • libdvdplay, a DVD navigation library.
  • VLS (VideoLAN Server), our legacy streaming server, which is now mostly replaced by VLC.
  • VLMa (VideoLAN Manager), a Java application to manage multiple VLC instances through their telnet interface.

Tuesday, June 3, 2008

CCleaner

CCleaner is a freeware system optimization and privacy tool. It removes unused files from your system - allowing Windows to run faster and freeing up valuable hard disk space. It also cleans traces of your online activities such as your Internet history. But the best part is that it's fast (normally taking less than a second to run) and contains NO Spyware or Adware! :)

Cleans the following

Internet Explorer
Temporary files, URL history, cookies, Autocomplete form history, index.dat.
Firefox
Temporary files, URL history, cookies, download history.
Opera
Temporary files, URL history, cookies.
Windows
Recycle Bin, Recent Documents, Temporary files and Log files.
Registry cleaner
Advanced features to remove unused and old entries, including File Extensions, ActiveX Controls, ClassIDs, ProgIDs, Uninstallers, Shared DLLs, Fonts, Help Files, Application Paths, Icons, Invalid Shortcuts and more... also comes with a comprehensive backup feature.
Third-party applications
Removes temp files and recent file lists (MRUs) from many apps including Media Player, eMule, Kazaa, Google Toolbar, Netscape, MS Office, Nero, Adobe Acrobat, WinRAR, WinAce, WinZip and many more...
100% Spyware FREE
This software does NOT contain any Spyware, Adware or Viruses.

What's New

[29th May 2008]
CCleaner v2.08New
- Added Startup tool enable/disable checkbox.
- Fixed problem with Vista "low" folders being removed.
- Improved index.dat detection on multiple scans.
- Secure deletion improved with IE History index.dat files.
- Added OS detection to INI files.
- Added Vista Thumbnail Cache cleaning.
- Added ImgBurn cleaning.
- Added Secure deletion to "Recent Documents" cleaning.
- Improved Vista "Recent Documents" cleaning.
- Fixed bug with Chkdsk chk files not being removed.
- Added "Select all" checkbox to header of Registry cleaner.
- Added sorting to Startup tool listview.
- Fixed Vista 64 issue with Startup tool.
- Added Croatian translation.
- Minor tweaks and GUI improvements.

Friday, May 30, 2008

NASA To Broadcast Landing on Mars Live on the Internet

nasalogo

Not only is NASA,the National Aeronautics and Space Administration, going to attempt to put another lander on Mars, but this time their doing it live on the Internet for all to see.

According to Michael Learmonth of Silicon Valley Insider, starting at 6 PM EST today, people can head to NASA’s website, or Second Life, to watch as NASA attempts to put the Phoenix Mars Lander down on solid ground. I only say “attempts” as missions to Mars have had a checkered past over the years, but the twin rovers of Spirit and Opportunity have certainly proven it can be done. If successful, the first message from Phoenix will be received at 8 PM EST to let mission control know that the lander has in fact touched down and the status of its components.

Phoenix will be landing in the northern arctic region of the planet where an ice layer is known to exist below the surface soil. The lander will be able to dig down to this layer, scoop up samples to put inside of its on board ovens, and then analyze the vapors to determine the mixture of liquid. In addition to this portion of the mission, it will also use an attached weather station to see what the climate is like in the far north, and use a mast-mounted camera to take pictures of the surrounding landscape.

The mission is expected to last 90 “sols”, or approximately 92 Earth days. As a possible comparison of Phoenix’s fortunes on Mars, Spirit and Opportunity were expected to last only 90 sols, but are now at 1562 and 1541 respectively.